DAS Trader Pro Advanced Hotkeys part 30
Trailing alert as a stop and alerts cleanup mechanism
If you have adopted one of the techniques I described in the previous posts
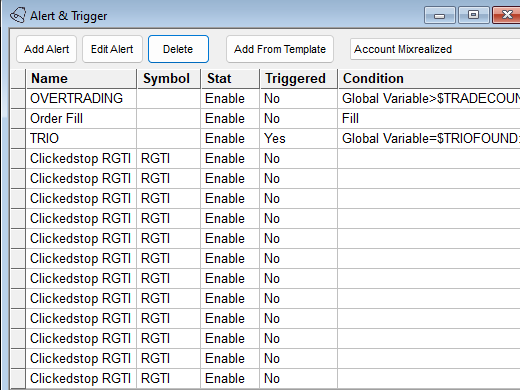
chances are that your Alert & Trigger window gets filled with a lot of alerts you need to manage. It is quite annoying, especially if you are using alerts for the extended hours stops.
Since the version of DAS Trader Pro 5.8.0.6 we can use the delete() function with alerts.
As i am using
$MYALERT.name="Clickedstop "+SYMB;to create those alerts, to delete an alert by name is as simple as calling this code
GetAlertObj("Clickedstop "+SYMB).delete();This will delete only one object from the alerts list. The last one to be exact. So to be able to delete more or all objects, we need to create a loop for the command.
$loop=10;
while ($loop>=0)
{
$TODELALERT=GetAlertObj("Clickedstop "+SYMB);
if (IsObj($TODELALERT))
{
$TODELALERT.delete();
}
$loop=$loop-1;
}
$MY1MINWINDOW.RemoveALLLines;
which will repeat the command 10 times. So the number 10 is just a guess on how many we might need. The maximum is 199 which should be enough. The last line removes all the drawn lines as I am using them to show the actual alert set on my chart like this
Anytime you need to delete a certain type of alert, you can use the above code to do so.
Now the more practical use of it. When I need to move the stop, I want to click on the chart, delete the old stop and set the new stop. As you have probably guessed by now, we just save the above code to a hotkey which we will call at the start of our creation alert hotkey.
I saved the above code as a hotkey
and named it ALRTDELALL.
The full code of the Alert stop hotkey is then
$MONTAGE.exechotkey("ALRTDELALL");
wait(200);
CXL ALLSYMB;
$CLICKEDSTOP=Price;
$MYALERT=NewAlertObj();
$MYALERT.name="Clickedstop "+SYMB;
if($MYPOS>0)
{
$MYALERT.AddItem("Last Sale","<",$CLICKEDSTOP);
$MYALERT.Script="$montage.symbol="+$MYSYMB+";$montage.exechotkey\(\"Sell100\"\);";
}
if($MYPOS<0)
{
$MYALERT.AddItem("Last Sale",">",$CLICKEDSTOP);
$MYALERT.Script="$montage.symbol="+$MYSYMB+";$montage.exechotkey\(\"Cover100\"\);";
}
$MYALERT.Speak=0;
$MYALERT.SYMB=$MYSYMB;
$MYALERT.PlaySound=0;
$MYALERT.Autodelete=1;
$MYALERT.Loop=0;
$MYALERT.save();
$MY1MINWINDOW.DrawHorzLineWithPrice($CLICKEDSTOP,color("255,128,128"));
the wait(200); in second line is not mandatory, I use it to have a more satisfactory feeling from the click.
Pretty neat solution. Many of us would like a trailing stop that works in extended hours. I will try to explain the logic and then at the end will give you a guidance on what is needed so you can put it together on your own.
Trailing alert as a stop
Let’s say we want to trail to the previous candle low as the one I covered in
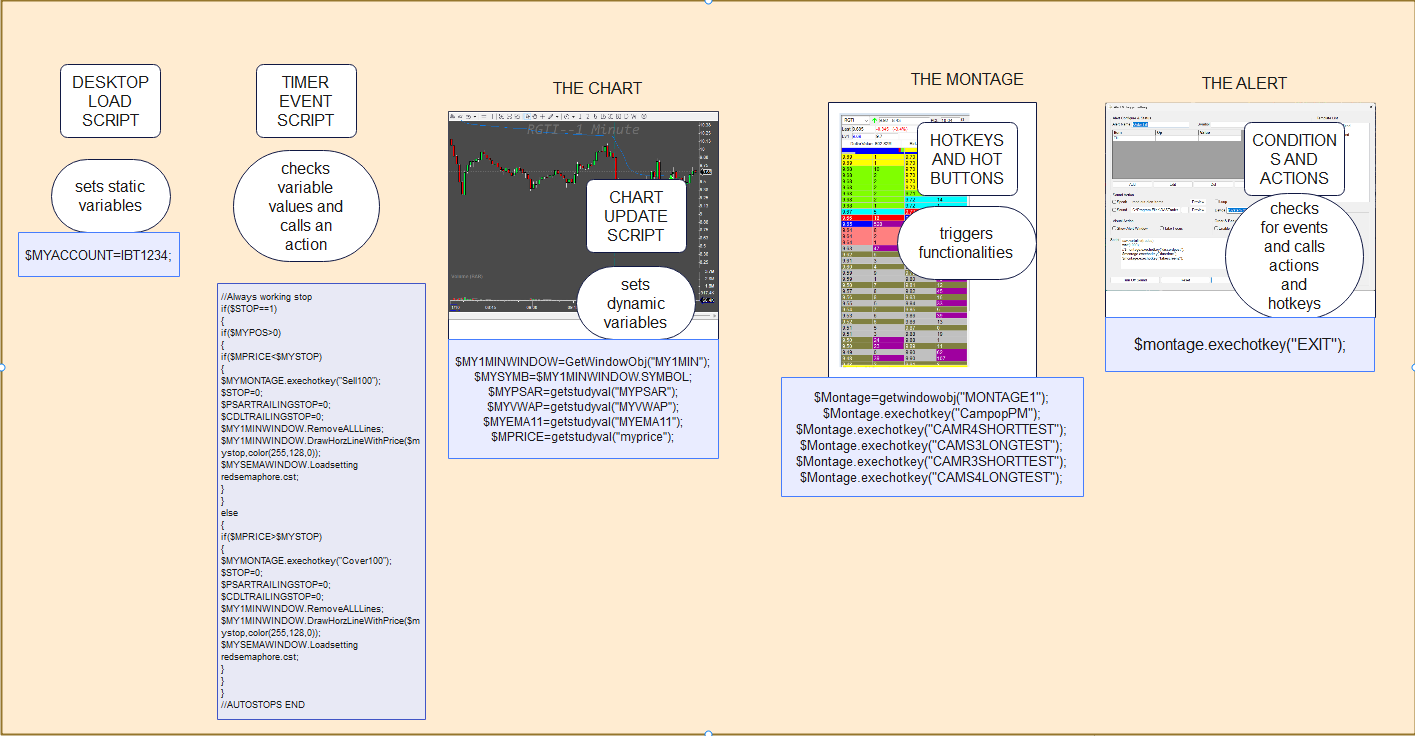
It is crucial that you understand the concept and also that you understand where to run which part of the code. This chart should help you to understand that.
It is obvious that to achieve the candle trailing, we need to
read the previous candle low/high
use the previous candle low/high as $CLICKEDSTOP for our alert script
call the update of the alert for the new one
create a trigger that will enable or disable the functionality
To read the previous candle low, we need this in the chart update script
$PCDLLOW=GetWindowObj("MY1MIN").getbar(-1).lo;but as we use more scripts, it is more practical to do it like this in two lines
$MY1MINWINDOW=GetWindowObj("MY1MIN");
$PCDLLOW=$MY1MINWINDOW.getbar(-1).lo;
$PCDLHIGH=$MY1MINWINDOW.getbar(-1).hi;
$MYSYMB=$MY1MINWINDOW.SYMBOL;
$MYPOS=GetAccountObj(YOUR_ACCOUNT_NAME).getposition($MYSYMB).share;
the $CLICKEDSTOP is normally set in the alert creation hotkey, so we need to change “Price” for $PCDLLOW or $PCDLHIGH in the alert stop hotkey
Let’s create a new Trailing Stop hotkey named ALERT CANDLE TRAIL STOP and change the stop type and variables accordingly not to mess with our clicked stops.
$MONTAGE.exechotkey("ALRTDELALL");
wait(200);
CXL ALLSYMB;
$MYALERT=NewAlertObj();
$MYALERT.name="Trailingstop "+SYMB;
if($MYPOS>0)
{
$MYALERT.AddItem("Last Sale","<",$TRAILINGSTOP);
$MYALERT.Script="$montage.symbol="+$MYSYMB+";$montage.exechotkey\(\"Sell100\"\);";
}
if($MYPOS<0)
{
$MYALERT.AddItem("Last Sale",">",$TRAILINGSTOP);
$MYALERT.Script="$montage.symbol="+$MYSYMB+";$montage.exechotkey\(\"Cover100\"\);";
}
$MYALERT.Speak=0;
$MYALERT.SYMB=$MYSYMB;
$MYALERT.PlaySound=0;
$MYALERT.Autodelete=1;
$MYALERT.Loop=0;
$MYALERT.save();
$MY1MINWINDOW.DrawHorzLineWithPrice($TRAILINGSTOP,color("255,128,128"));
as we named the new alerts differently, the alert deletion hotkey needs to be adapted accordingly. This is the new Alert delete hotkey named ALRTDELTRAIL
$loop=10;
while ($loop>=0)
{
$TODELALERT=GetAlertObj("Trailingstop "+SYMB);
if (IsObj($TODELALERT))
{
$TODELALERT.delete();
}
$loop=$loop-1;
}
$MY1MINWINDOW.RemoveALLLines;
If we want to walk away from our charts and need it automated, we need to code more functionality so that the trailing stop alert gets called every second in the event timer script and that the $TRAILINGSTOP variable is set and updated accordingly.
To get an automated trail like on the video below, things get a bit complicated as we need to do some cleanup of variables and checks not to update the alert every second otherwise the screen would be blinking too much, and also it is not very useful to update the alert every second while the candles can update only once in a minute or fewer times when you use different time frame to trail your stops.
All that is left is the event timer script that would check if the candle trail should be updated and a trigger button that will enable the functionality.
Keep reading with a 7-day free trial
Subscribe to Peter’s Substack to keep reading this post and get 7 days of free access to the full post archives.


