

Few versions back, we got the possibility to change button names and colors dynamically. There are many useful use cases where we can take the advantage of it. It works only for buttons that are attached to the sides of the windows as shown in the previous post, not for the old school montage hot buttons. At the moment works only for the white theme. The dark one has a bug.

I will show the functionality in useful examples.
1. Button showing the actual value
this is useful for switching between accounts or enabling/disabling things. It will indicate you the current status of the thing you triggered, which is a super neat feature.
Switch between 2 accounts
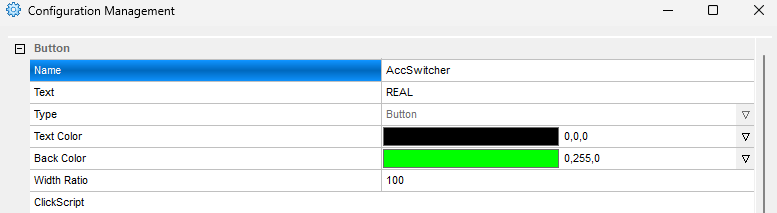
To get this functionality, the button needs to be named. “AccSwitcher” in my example.
If the button is attached to the Montage window, you need to read the Montage window object with $MONTAGE=getwindowobj("MONTAGE1");
then we can put the self changing code in the button ClickScript
$MONTAGE=getwindowobj("MONTAGE1");
if ($MYACCOUNT=="0")
{
$MYACCOUNT="SIM ACCOUNT";
$montage.GetCustButObj("AccSwitcher").text =SIM;
$montage.GetCustButObj("AccSwitcher").bkcolor=red;
$MONTAGE.ACCOUNT=SIMACCOUNT;
}
else
{
if ($MYACCOUNT=="SIM ACCOUNT")
{
$MYACCOUNT="REAL ACCOUNT";
$montage.GetCustButObj("AccSwitcher").text =REAL;
$montage.GetCustButObj("AccSwitcher").bkcolor=green;
$MONTAGE.ACCOUNT=REALACCOUNT;
}
else
{
$MYACCOUNT="SIM ACCOUNT";
$montage.GetCustButObj("AccSwitcher").text =SIM;
$montage.GetCustButObj("AccSwitcher").bkcolor=red;
$MONTAGE.ACCOUNT=SIMACCOUNT;
}
}
We change the $MYACCOUNT variable and at the same time we switch the account on montage and change the text and the color. The values for SIMACCOUNT and REALACCOUNT need to be real, otherwise they will not change on your montage.
All the magic happens with the GetCustButObj() function. The button has these properties:

So we can change
text
background color
text color
Switch between more values
$MONTAGE=getwindowobj("MONTAGE1");
if ($MYACCOUNT2=="0")
{
$MYACCOUNT2="SIM";
$montage.GetCustButObj("AccSwitcher2").text =$MYACCOUNT2;
$montage.GetCustButObj("AccSwitcher2").bkcolor=green;
return;
}
if ($MYACCOUNT2=="SIM")
{
$MYACCOUNT2="REAL ACC1";
$montage.GetCustButObj("AccSwitcher2").text =$MYACCOUNT2;
$montage.GetCustButObj("AccSwitcher2").bkcolor=orange;
return;
}
if ($MYACCOUNT2=="REAL ACC1")
{
$MYACCOUNT2="REAL ACC2";
$montage.GetCustButObj("AccSwitcher2").text =$MYACCOUNT2;
$montage.GetCustButObj("AccSwitcher2").bkcolor=red;
return;
}
if ($MYACCOUNT2=="REAL ACC2")
{
$MYACCOUNT2="SIM";
$montage.GetCustButObj("AccSwitcher2").text =$MYACCOUNT2;
$montage.GetCustButObj("AccSwitcher2").bkcolor=green;
return;
}
This makes my previous helper semaphore charts an obsolete solution as the status of my pre-market stops can be now shown on the very button that triggers them or under the chart.
2. New place for semaphores
I have a scoring system for reversal occurrence that calculates the conditions and gives each condition a scoring number. It is described here.

On my chart, I have a semaphore button that is showing me when to enter. I change the color gradually to show how the setup triggers each of the conditions. See the video below.
The called reversal worked, although I did not take the trade as I was recording it for the purposes of this post. It worked for nearly 4R at the time of writing this.

When the setup is ready, I get a green light to enter the trade. The semaphore functionality is done by this code running in the chart update script of my chart
///SEMAPHORE
$1MINBUTTONTEXT="---";
$my1minchart.GetCustButObj("Reversal").bkcolor=gray;
$my1minchart.GetCustButObj("Reversal").text =$1MINBUTTONTEXT;
if($MYSCORE>29)
{
$my1minchart.GetCustButObj("Reversal").bkcolor=yellow;
$1MINBUTTONTEXT="Rev...";
$my1minchart.GetCustButObj("Reversal").text =$1MINBUTTONTEXT;
}
if($MYSCORE>51)
{
$my1minchart.GetCustButObj("Reversal").bkcolor=orange;
$1MINBUTTONTEXT="Rever...";
$my1minchart.GetCustButObj("Reversal").text =$1MINBUTTONTEXT;
}
if($MYSCORE>65)
{
$my1minchart.GetCustButObj("Reversal").bkcolor=blue;
$1MINBUTTONTEXT="Reversal";
$my1minchart.GetCustButObj("Reversal").text =$1MINBUTTONTEXT;
}
if($MYSCORE>76)
{
$my1minchart.GetCustButObj("Reversal").bkcolor=Green;
$1MINBUTTONTEXT="Reversal!!!";
$my1minchart.GetCustButObj("Reversal").text =$1MINBUTTONTEXT;
}
///SEMPAHORE
The button is called “Reversal” and I run the conditions that calculate the scoring system separately in my timer event script every second. The button itself can have a functionality code for entering (or calling to enter) the position and attaching a range order to it.
3. Place to show valuable information
Somebody might want to display a reminder of some condition like RVOL or SSR closer to the chart for better visibility.
Keep reading with a 7-day free trial
Subscribe to Peter’s Substack to keep reading this post and get 7 days of free access to the full post archives.